

Teach Positions
Before the PF400 can move a plate, it needs to know where the plate sits. You show it: drive the arm to the nest, capture the pose, and the Teach view walks you through the approach and the safe point that go with it. Robot Arms explains the kinds of teachpoints and how they fit together.
You need the PF400 connector running (setup) and the arm homed. To practice without moving anything, run the
connector in simulation, which is its default (simulation: true in its configuration). To go back
to the real arm, set simulation to false and restart the connector: switching with the
Simulation Controller module does not install the connector's program on the controller.
Before you teach
- Teach last. Bolt the arm and the instruments down first. A teachpoint is only right while both stay where they were taught.
- Teach with real labware in the nest, the same type the workflow will move.
- Stay at the arm. Stand with a hand near the emergency stop, jog at Slow, and keep other people out of its reach.
Open the Teach view
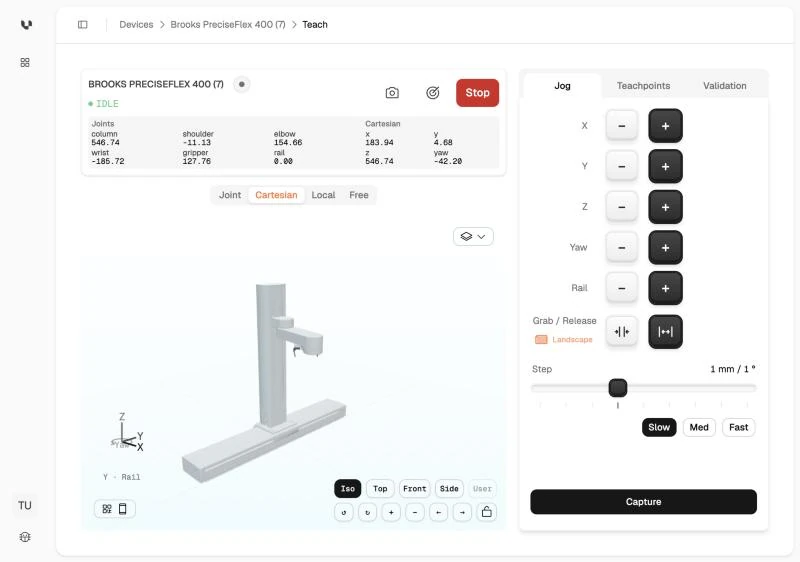
Open Devices, select the arm, then Teach at the top right. The view shows:
- The arm's state and its live position, as joint values and as a Cartesian pose.
- A 3D model of the arm that follows the real one.
- Three tabs: Jog to move the arm, Teachpoints for what you have captured, and Validation to drive a route through them.
- A red Stop button. It halts the arm and cuts motor power.
Move the arm to the nest
Put a plate in the nest, then bring the jaw to it in one of two ways:
- Jog. Pick a frame (Joint, Cartesian or Local, which moves relative to the gripper), set the Step and the speed (Slow, Med or Fast), and press the plus and minus keys. On an arm with a linear rail there is a Rail row too. Start with a large step to get close and finish at 1 mm, at Slow.
- Free. Switch to Free and move the arm by hand. The motors release, so support the arm before you switch. Leaving free mode grips every axis again.
Use Grab / Release to check that the jaw closes squarely on the plate. The orientation next to it, Landscape or Portrait, is how the jaw holds the plate.
Capture the nest
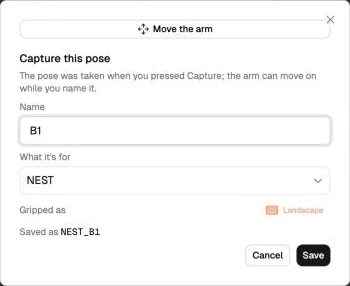
Press Capture. The pose is taken at that moment, so the arm can move on while you fill in:
- Name: the station, for example
A1. The tool adds the kind in front and saves the point asNEST_A1. - What it's for: NEST.
- Gripped as: the orientation the jaw holds the plate in.
Then Save.
Add the approach, transitions and safe point
After the nest, the dialog asks for the rest of the group, one step at a time.
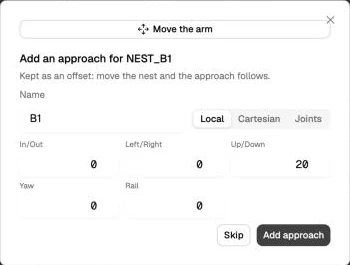
- Add an approach. Enter how far the approach sits from the nest. The default, 20 mm up in the
Local frame, lifts the plate straight out. The approach is stored as an offset, so if you
re-teach the nest later, the approach follows. Select Add approach.
- Go to the approach. Select Yes and the arm drives there, so you can see it clears the instrument. Make sure the path is clear first.
- Add a transition. If the arm has to pass through a particular pose on its way in and out, move it there and Capture. Repeat as often as the path needs, then Done.
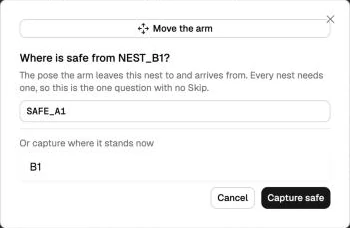
- Choose a safe point. Every nest needs one, so this step cannot be skipped. Pick a safe point
you already taught from the list, or select Move the arm, drive it to a pose clear of every
instrument, and Capture safe.
The Teachpoints tab now shows the station as a group with its safe point, approach and nest. Select a point to see its joint and Cartesian values, and Reteach from current pose if it needs correcting. The target icon next to a point sends the arm to it. A point's menu has Edit and Delete; a group's has Rename and Delete.
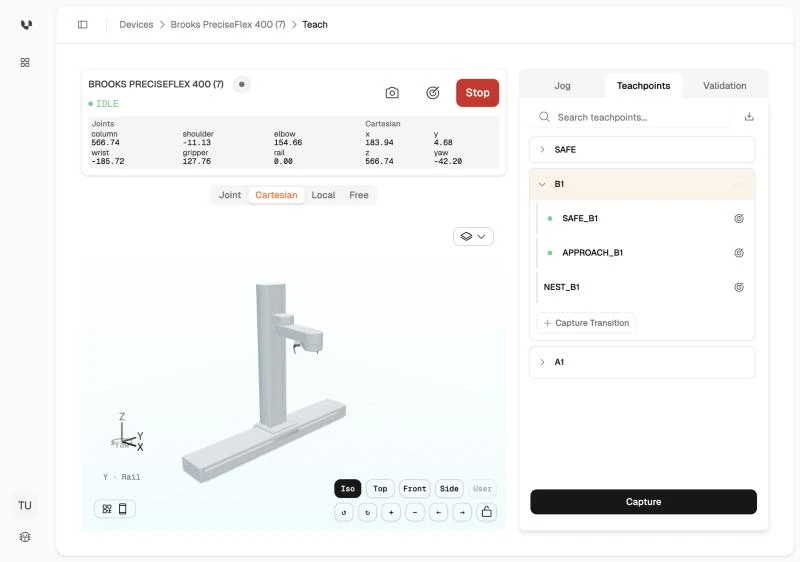
Teach each station the same way. Where two stations can share a safe point, pick the existing one in the last step: shared safe points form the spine the arm travels along between stations. On an arm without a rail, the spine follows the order you capture its safe points in, so teach them in the order they sit on the bench.
Check a route
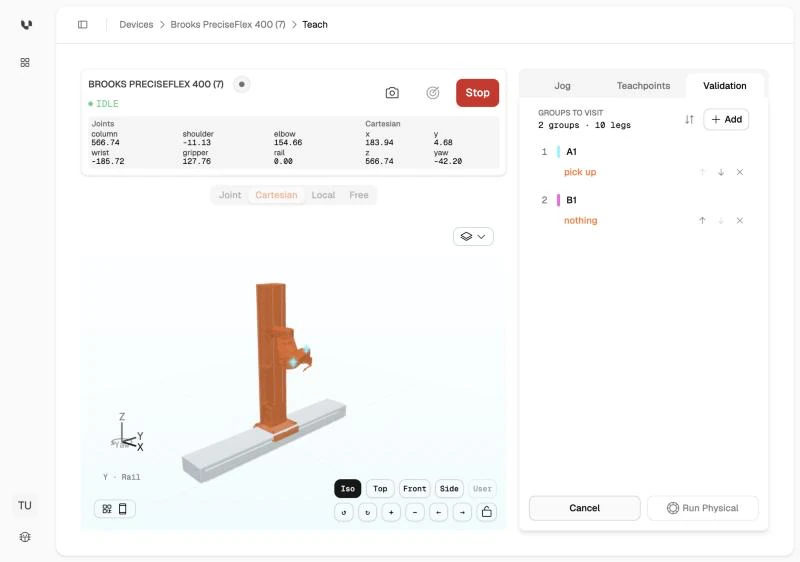
On the Validation tab, Add the groups the arm should visit, in order, and choose what it does at each: nothing, pick up or put down. The route in and out of each follows its own approach and the safe spine. Run Virtual plays it on the 3D model; Run Physical drives the arm. Run it virtually first.
Use the teachpoints
Teachpoints are saved on the platform as you capture them, attached to this arm. A script reads them from there: Move a plate shows how.
To keep a copy, for version control or to pin a workflow to one set of points, select the download icon next to the search field on the Teachpoints tab. The file holds every teachpoint and group for this arm, each point with its joint values.
Last updated