UniteLabs
Guides

How to create a workflow?

This guide describes how to create a flow with different methods

Overview

After adding a connector, you might want to create a workflow. This can be done in two ways:

  • Via the UniteLabs platform UI: Use the visual workflow builder to define your flow, including parameters and logic.
  • Via the API: Programmatically create a workflow by submitting a payload with the required parameters, structure, and triggers.

Introduction: Unlock the Power of Python Workflows

This guide will show you how to quickly test your Python workflows using our online editor, and then seamlessly transition to a robust local development and deployment setup on our platform.

  • Why use Workflows?
    Our Workflows platform provides reliability, observability, and scalability for all your automation needs.
  • Who is this for?
    This guide is for data engineers, data scientists, and developers looking to orchestrate and manage Python code. Please select the desired option to see how to create a flow:

Refer to the general section for an overview of the workflow UI.

Step-by-Step: Create a Workflow via the Web-App

Follow these steps to define a workflow using the UniteLabs platform UI. Access our intuitive online editor directly in your browser. The simple user interface features a code editor where you can write your Python workflows and an output/logs pane to see immediate results.

  1. Navigate to the Workflows Section
    Go to the 'Workflows' tab from the platform navigation menu.
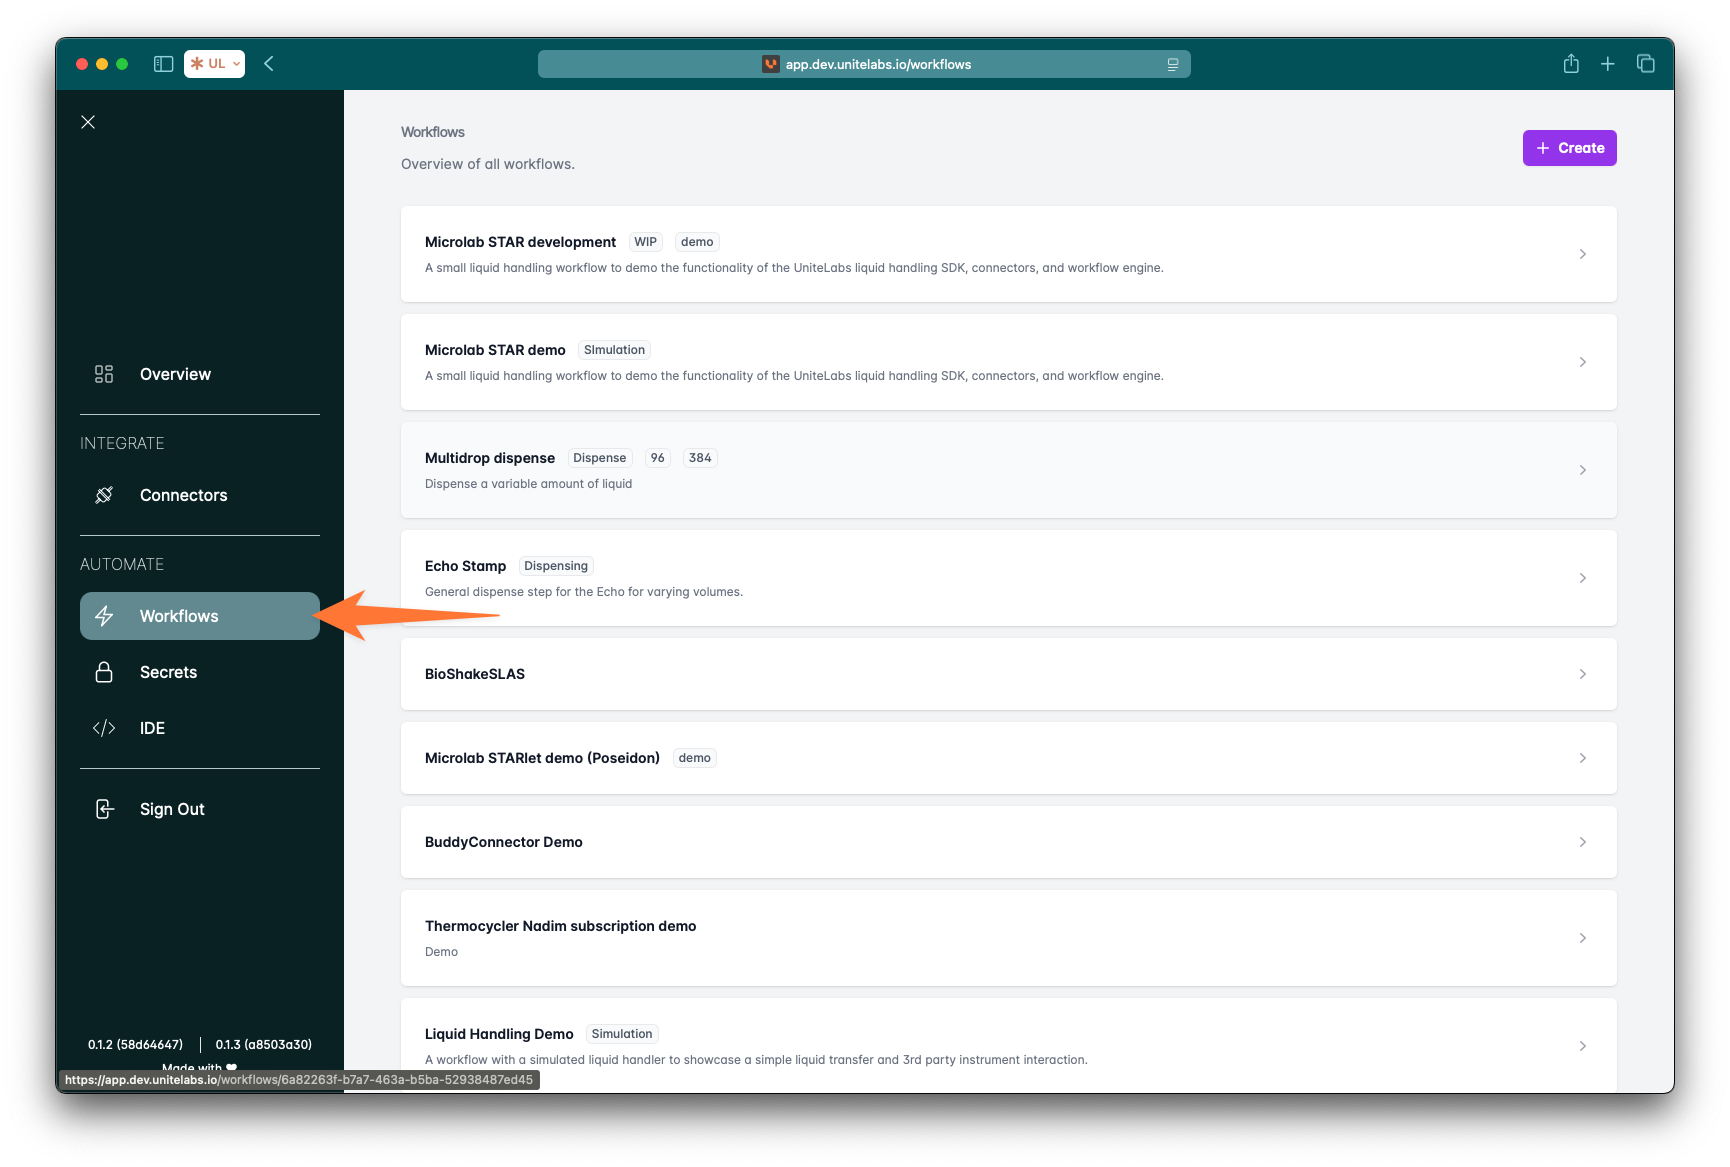
 Screenshot: Open Workflows Tab
  2. Click on "Create"
    Start a new workflow using the "Create" button.
    Screenshot: New Workflow Button
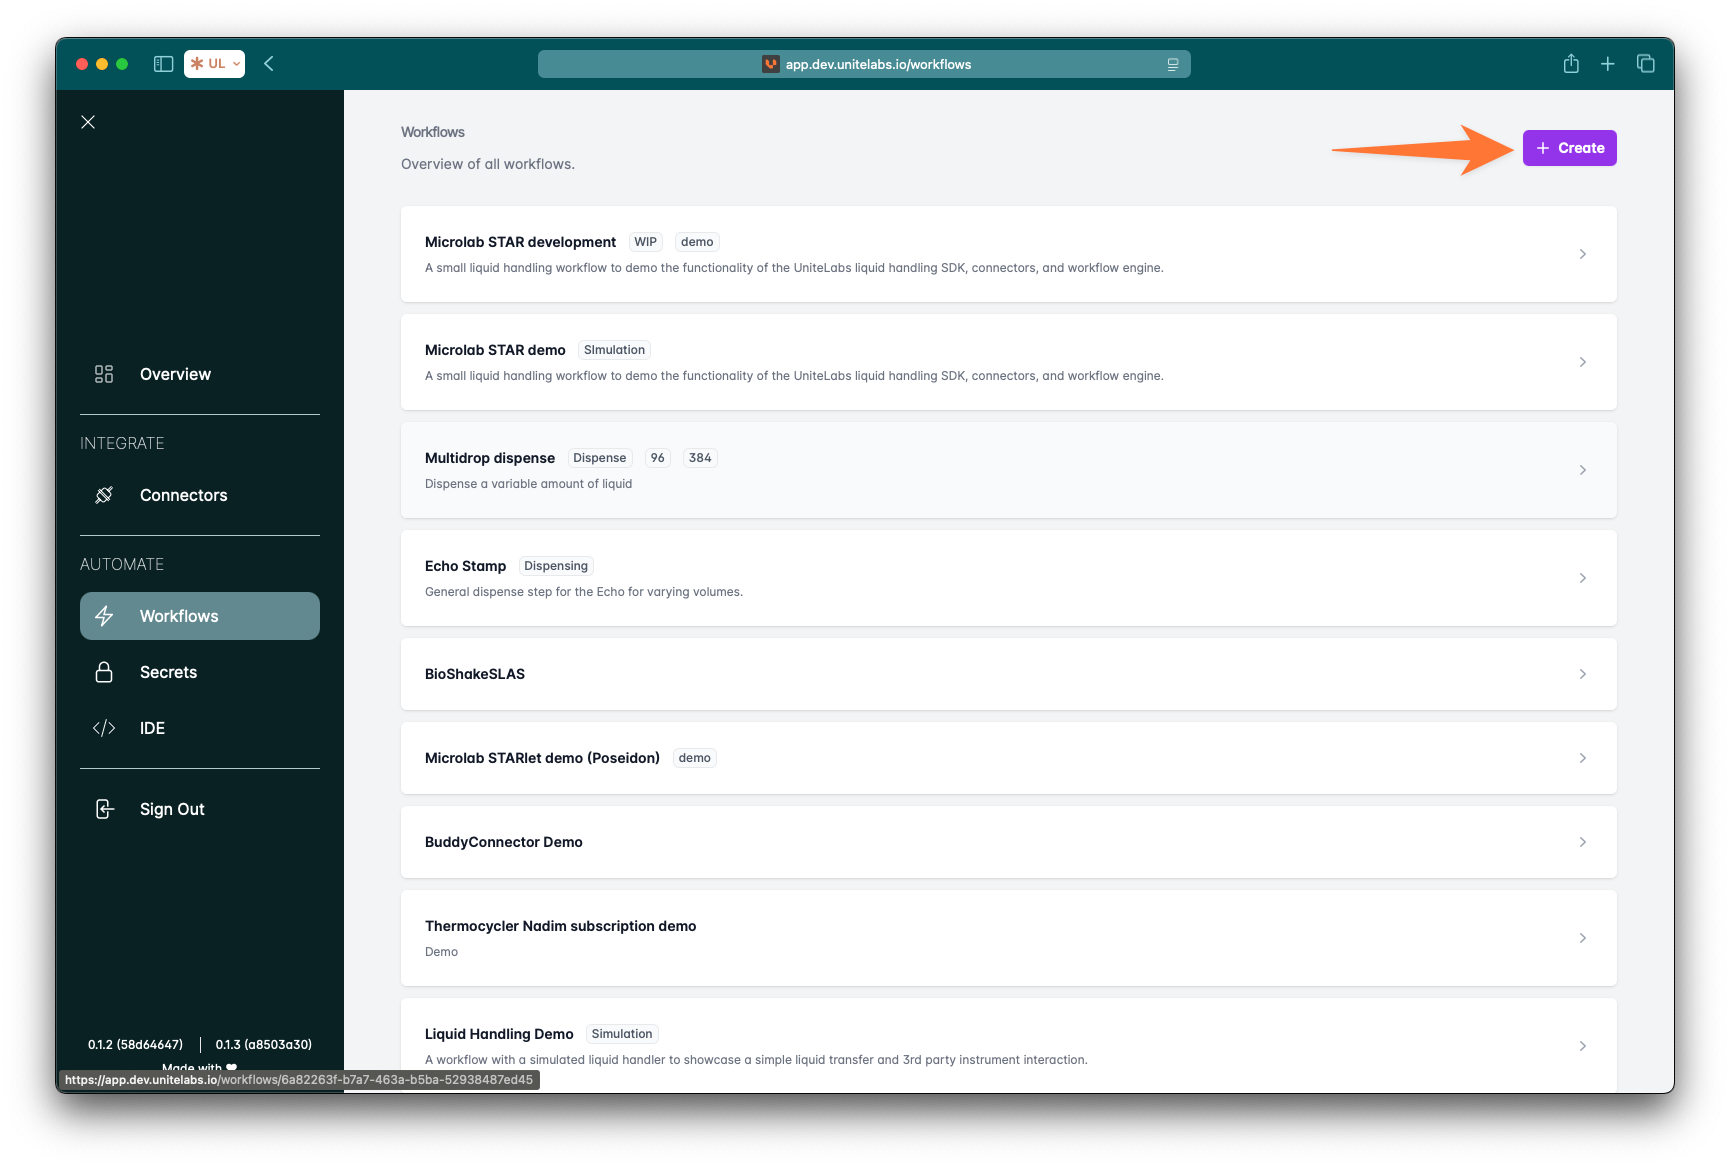
  3. Define Workflow Metadata Provide the essential metadata that describes your workflow. These fields help you organize & identify your workflows.
    Screenshot: Metadata Fields
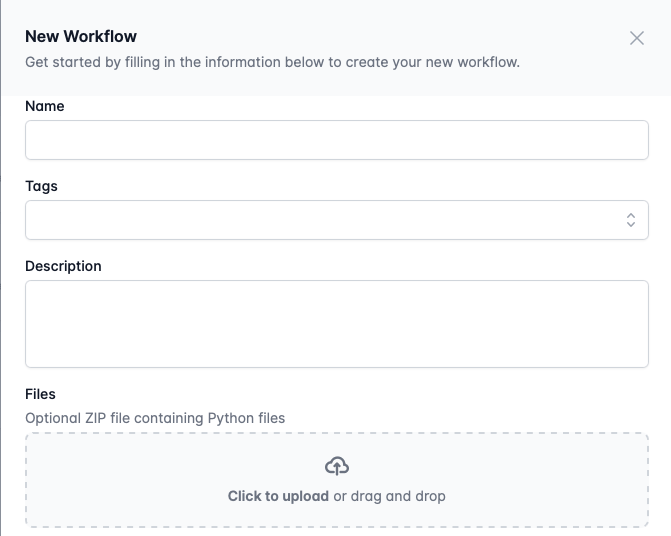
    • name: A required field. The human-readable name of your workflow.
    • tags: Optional. Keywords for categorization or filtering. Hit enter to add a new tag.
    • description: Optional. A longer explanation of what your workflow does.
    • files: Optional. Upload a .zip archive containing Python source files to include in the workflow logic.
  4. Add Workflow Logic to your first workflow
    Use the visual editor or code interface to add logic blocks, data operations, or Python scripts:
    Screenshot: Workflow Logic
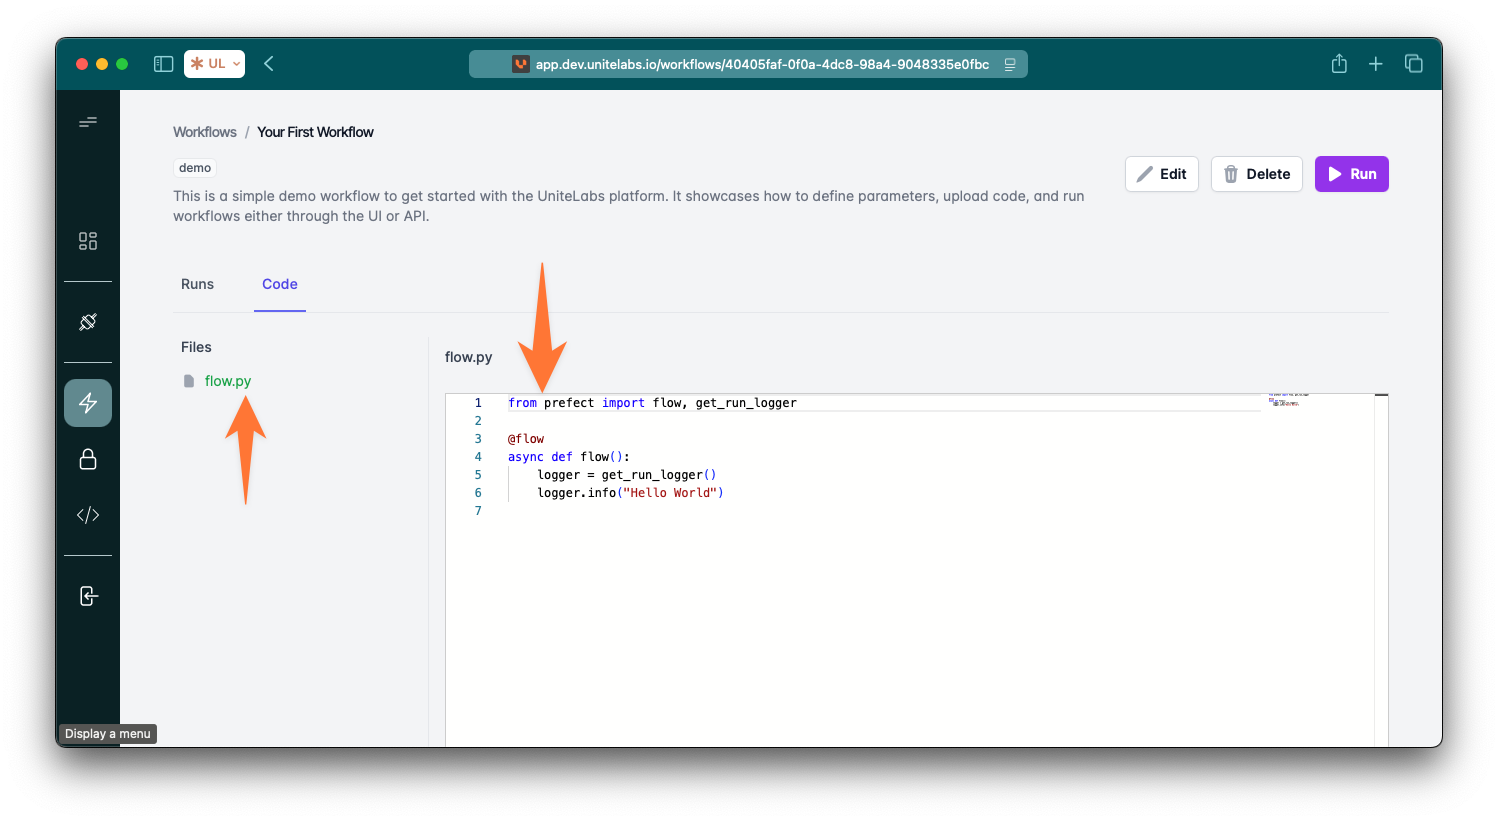
    Let's start with a simple example. Copy and paste the following Python code into the online editor:
     from your_workflow_sdk import task, flow
     
     @task
     def say_hello(name: str):
         print(f"Hello, {name}!")
         return f"Hello, {name}!"
     
     @task
     def say_goodbye(name: str):
         print(f"Goodbye, {name}!")
         return f"Goodbye, {name}!"
     
     @flow(name="My First Online Workflow")
     def simple_greeting_flow(person_name: str = "World"):
         hello_message = say_hello(person_name)
         goodbye_message = say_goodbye(person_name)
         print(f"Flow completed with messages: {hello_message}, {goodbye_message}")
     
     if __name__ == "__main__":
         simple_greeting_flow(person_name="Online User")
    
  5. Run the flow
    See the "How to trigger workflows" guide for a comprehensive overview on how your created workflow could be run.

Feel free to modify the code, change the input, or add new tasks. The online editor provides immediate feedback, making it an excellent environment for quick testing and learning core workflow concepts.

Note:
The online editor is designed for rapid prototyping. It doesn't support creating advanced project structures. For those capabilities, you'll want to move to local development.

Professional Development: Local Setup & Git Workflow

For more robust development, version control, and collaboration, setting up a local environment connected to a Git repository is essential.

  • Python: We recommend using Python 3.9 or newer.
    • Virtual Environments: Always use a virtual environment (like uv) to manage your project's dependencies and avoid conflicts with other Python projects. uv is a fast and modern Python package installer and resolver.
      • Installing uv:
        pip install uv
        

        Alternatively, you can install uv via curl or other methods as described in the uv documentation.
      • Using uv to create and activate an environment:
        uv venv .venv
        source .venv/bin/activate  # On Windows: .venv\Scripts\activate
        
        
    • Workflows SDK/Client Installation: Install our Python SDK within your activated virtual environment.
    • IDE: We highly recommend using a powerful Integrated Development Environment (IDE) such as VS Code or PyCharm. These IDEs offer features like code completion, integrated debugging, and seamless Git integration, which greatly enhance your development experience.

2. Connecting to Your Git Repository

Git is crucial for version control, collaborative development, and implementing best practices for deploying your workflows.

  • Clone your repository:
    git clone https://github.com/your-org/your-workflow-repo.git
    cd your-workflow-repo
    
    
    • Project Structure: A common and recommended project structure for your workflows might look like this:
      your-workflow-repo/
      ├── .venv/                 # Your Python virtual environment
      ├── flows/                 # Directory for your workflow definitions
      │   └── my_first_workflow.py
      ├── tests/                 # Optional: for unit tests
      ├── pyproject.toml         # Project metadata and dependencies (using uv, Poetry, Hatch, etc.)
      └── README.md


3. Developing Your Workflows Locally

  • Writing Workflows: You can now create more complex workflows with multiple steps, custom functions, and external library imports directly in your IDE.
    • Testing Locally: Run your workflows directly from your terminal within your activated virtual environment:
      uv run flows/my_first_workflow.py
      
      
    • Debugging: Utilize your IDE's debugging tools to set breakpoints, inspect variables, and step through your workflow code.
    • Requirements Management: Manage your project dependencies using pyproject.toml. This ensures consistent environments across development and deployment.
      • Example pyproject.toml (using Poetry for illustration):
        [tool.poetry]
        name = "your-workflow-project"
        version = "0.1.0"
        description = "Your Python Workflows"
        authors = ["Your Name <you@example.com>"]
        
        [tool.poetry.dependencies]
        python = ">=3.9,<3.12"
        your-workflow-sdk = "^1.0"
        # Add other dependencies here, e.g., pandas = "^2.0"
        
        [build-system]
        requires = ["poetry-core"]
        build-backend = "poetry.core.masonry.api"
        
        
      • Installing/Syncing dependencies with uv from pyproject.toml:
        uv sync


        This command will install all dependencies specified in your pyproject.toml into your active virtual environment.

Deployment: From Local development to the UniteLabs Platform

Once your workflows are developed and tested locally, the next step is to deploy them to our Workflows platform for reliable, scheduled, and observable execution.

1. Workflow Concepts for Deployment

  • Workflows vs. Deployments: In our system, a "Workflow" refers to the Python code defining your automation logic. A "Deployment" is a configured instance of that workflow, ready to be executed and managed by the Workflows platform orchestrator.
  • Your Platform's Service: Your deployed workflows will run and be managed by the Workflows orchestrator, which handles scheduling, retries, logging, and monitoring.

2. Crafting Your Deploy Scripts

Deployment scripts are Python files that facilitate pushing your workflow code and its configuration to our platform.

  • Purpose: These scripts leverage our platform's API to upload your repository files and specify the entrypoint (the Python file and function) where your actual workflow is located. This allows the Workflows platform to discover and execute your automation logic.
  • Key Information for Deployment: When preparing your deployment, you'll typically specify:
    • The location of your workflow files (e.g., a Git repository URL or a local path to be uploaded).
    • The entrypoint: This is the path to your Python file (e.g., flows/my_first_workflow.py) and the name of the workflow function within that file (e.g., simple_greeting_flow).
    • A unique name for your deployment.
    • A list of dependencies that can be parsed by pip install commands
  • Learn more about API-based deployment of Workflow Files: You can upload or update workflow files using the API with multipart/form-data. Below are examples for both POST (create) and PATCH (update) requests using curl to deploy your workflows.

Create a New Workflow (POST)

Pre-requisites:

  • zip your project file (zip -r unitelabs-trigger.zip unitelabs-trigger)
  • have your authorization saved in a .env file in same folder as your command line (see example in Authenticate client)
  • install needed .env reading package (brew install jq for Mac for example)

Create the following bash file to create a new workflow by uploading a ZIP file:

  #!/bin/bash

  # Load environment variables from .env
  export $(grep -v '^#' .env | xargs)

  # Step 1: Get the token
  AUTH_RESPONSE=$(curl -s -X POST "${AUTH_URL%/}/token" \
    -H "Content-Type: application/x-www-form-urlencoded" \
    -d "grant_type=client_credentials" \
    -d "client_id=$CLIENT_ID" \
    -d "client_secret=$CLIENT_SECRET")
  
  # Extract the token using jq (make sure jq is installed, example for Mac: brew install jq)
  TOKEN=$(echo "$AUTH_RESPONSE" | jq -r '.access_token')
  
  if [[ "$TOKEN" == "null" || -z "$TOKEN" ]]; then
    echo "Failed to retrieve token. Response was:"
    echo "$AUTH_RESPONSE"
    exit 1
  fi

  curl -X POST $BASE_URL/v1/workflows \
    -H "Authorization: Bearer $TOKEN" \
    -H "Content-Type: multipart/form-data" \
    -F "file=<PROJECT_ZIP>" \
    -F "name=<FLOW_NAME>" \
    -F "entrypoint=<ENTRYPOINT_FILE>" \
    -F "description=<DESCRIPTION>"

Parameters:

  • API_BASE_URL: Base URL of your API (e.g., https://api.unitelabs.io/<YOUR_TENANT_ID>/v1/workflows/)
  • TOKEN: Your authorization token
  • PROJECT_ZIP: Path to the ZIP file containing your workflow files
  • FLOW_NAME: Desired name of the workflow
  • ENTRYPOINT_FILE: Main Python file to run (inside the ZIP)
  • DESCRIPTION: Short description of the workflow

Save the file (for example as deploy.sh). Then make it executable via:

chmod +x deploy.sh`

Execute the deploy script by:

./deploy.sh

Update an Existing Workflow (PATCH)

To update an existing workflow (e.g., replace its files), follow the same setup as above, but use the following pattern:

  #!/bin/bash

  # Load environment variables from .env
  export $(grep -v '^#' .env | xargs)

  # Step 1: Get the token
  AUTH_RESPONSE=$(curl -s -X POST "${AUTH_URL%/}/token" \
    -H "Content-Type: application/x-www-form-urlencoded" \
    -d "grant_type=client_credentials" \
    -d "client_id=$CLIENT_ID" \
    -d "client_secret=$CLIENT_SECRET")
  
  # Extract the token using jq (make sure jq is installed, example for Mac: brew install jq)
  TOKEN=$(echo "$AUTH_RESPONSE" | jq -r '.access_token')
  
  if [[ "$TOKEN" == "null" || -z "$TOKEN" ]]; then
    echo "Failed to retrieve token. Response was:"
    echo "$AUTH_RESPONSE"
    exit 1
  fi
    
  curl -X PATCH $BASE_URL/v1/workflows/<WORKFLOW_ID>/files \
    -H "Authorization: Bearer $TOKEN" \
    -H "Content-Type: multipart/form-data" \
    -F "file=<PROJECT_ZIP>"

Parameters:

  • WORKFLOW_ID: The ID of the workflow you’re updating
  • TOKEN: Your authorization token
  • PROJECT_ZIP: The path to your new ZIP file

Notes

  • Both endpoints require multipart/form-data content type.
  • Make sure file paths are valid in your local or CI/CD environment.
  • PATCH is ideal for automated updates in CI pipelines.

3. Continuous Integration/Continuous Deployment (CI/CD)

CI/CD automates the process of testing and deploying your workflows, ensuring consistency and efficiency.

  • Why CI/CD? Automating your workflow builds and deployments reduces manual errors, speeds up delivery, and ensures your production environment is always up-to-date with your latest code.
  • Conceptual Overview: CI/CD pipelines automate the process of pushing code changes, running tests, and then using API calls to deploy your workflow to the Workflows platform. This integration can be set up with popular CI/CD platforms such as GitHub Actions, GitLab CI/CD, Jenkins, and others.
  • Example (High-Level GitHub Actions Workflow - .github/workflows/deploy.yml):
    name: Deploy Workflows
    
    on:
      push:
        branches:
          - main # Trigger on pushes to the main branch
    
    jobs:
      deploy:
        runs-on: ubuntu-latest
        steps:
        - name: Checkout code
          uses: actions/checkout@v3
    
        - name: Set up Python
          uses: actions/setup-python@v4
          with:
            python-version: '3.9' # Or your preferred Python version
    
        - name: Install dependencies
          run: |
            # Install uv
            pip install uv
            # Use uv to sync dependencies from pyproject.toml
            uv sync
            pip install your-workflow-sdk # Ensure SDK is installed, uv might handle this if in pyproject.toml
    
        - name: Run tests (Optional)
          run: |
            # python -m pytest tests/
    
        - name: Authenticate with Workflows Platform
          env:
            WORKFLOWS_API_KEY: ${{ secrets.WORKFLOWS_API_KEY }} # Your API key stored as a GitHub Secret
          run: |
            # Command to authenticate your SDK with the platform, e.g.,
            # your-workflow-sdk auth login --key $WORKFLOWS_API_KEY
    
        - name: Build and Apply Deployment
          run: |
            # This step would invoke your API calls or a simplified SDK command
            # that internally makes the API calls to push files and define the deployment.
            echo "Executing API calls to deploy workflow..."
            # For example: python -c "import requests; requests.post('YOUR_DEPLOY_API_ENDPOINT', json={'entrypoint': 'flows/my_first_workflow.py:simple_greeting_flow', 'repo_url': '...' })"
    
        - name: Notify success (Optional)
          run: echo "Workflow deployment successful!"
    
    
  • Key Steps in CI/CD:
    • Trigger: Define when the pipeline should run (e.g., on every push to main).
    • Install Dependencies: Ensure all necessary Python packages, including your your-workflow-sdk, are installed.
    • Run Tests: (Highly recommended) Execute your unit and integration tests to ensure code quality.
    • Build Workflow Deployment: This step now refers to the process of preparing your code and metadata for the API call.
    • Apply Workflow Deployment: This involves making the necessary API calls to your Workflows platform to register your deployment, pushing the code, and specifying its entrypoint.
    • Secrets Management: Store sensitive information like API keys (WORKFLOWS_API_KEY) securely in your CI/CD platform's secret manager, rather than hardcoding them in your repository.

4. Run the flow

See the "How to trigger workflows" guide for a comprehensive overview on how your created workflow could be run.

Conclusion: Your Workflow Journey

You've now learned how to leverage both the rapid prototyping capabilities of our online editor and the robust, version-controlled development workflow using Git and your local IDE. By combining these approaches, you can efficiently build, test, and deploy powerful Python workflows to our Workflows platform.

Ready to build powerful lab automation? Start deploying your Python Workflows today!


Copyright © 2025